|
With many different styles of hard cover bindings, the examination process is complex. There are great differences between a thin, side-sewn, square-back hard cover structure and a bulky, rounded and backed binding. Simplify the task by starting with the text block. Whether they are adhesive bound or sewn, the text blocks must be trimmed on three sides. Examine the text-block Are the edges free of smudges, nicks and knife marks? Keep in mind that there are times when publishers try to imitate a rough “deckle-edge” on the fore-edge. I have had people come to me with such bindings saying that there must be a mistake! Creating such an unusual edge, an imitation of hand made paper, not only costs more, but requires a painstaking process to achieve such an effect. Are there any splits in the binding? This often occurs if coated and uncoated papers are mixed together. On certain digital presses, silicon fusion particles may cause shifting and splits in the text blocks, especially if they are mixed with other paper stocks. If a book is being rebound, is all the text still present or did the binder trim-off some of the text or images? Check if the text-blocks are square. If rounded and backed, is the round uniform and even? Is the backing uniform too large or too small? On a properly backed text-block, the shoulders should equal the thickness of the text block plus the thickness of the boards. There are exceptions, like on adhesive bindings where we sometimes create a so-called “pin- head.” This is a deliberate, smaller shoulder as not to split the relative fragile adhesive binding forcing to stretch and bend. If a text block has headbands and reinforcing materials on the spine, do they adhere well? Book covers There are many different kinds of book cover materials. If the covering material is laminated, are the covers free of scratches and bubbles? If the covering materials are made from cloth or paper substrates, natural, coated or finished in many different ways, they should be clean of smudges, glue, nicks or bubbles. Is the covering material turned-in nice and evenly? Are the boards the right thickness, or do they feel too light or too heavy for a particular format? Are the corners shaped in a professional manner? Are the covers warped? Casing-in Casing-in is the multi-step process to combine the text block with the cover. In examining it, you will look at the application of water-based adhesive onto the end sheets, the cover dimension in regard to the trimmed text block, the edges, joints, pressing and overall fit. First, open a book in the front and back. If the pages adhere to each other, the binder used excess glue. Carefully separate those sheets from each other with a bone folder or a dull knife; do not use your fingers as the sheets will tear! Using your left and right hands hold the cover panels and let the text block dangle down. Now check joint adhesion. If the text block is loose in the hinges, return the book as it will not last. With even minimal use, the cover will separate from the text block. Check end sheets for wrinkles, looseness and/ or bubbles. Are all edges square? They should be 1/8 to 3/16 inches on all three sides and uniform. Now press your finger onto the spine. Does the cover fit tight? There should be no looseness. Are the joints (grooves) straight and neat? Finally, if library bound, examine the lettering. Is it legible, properly centered and arranged as specified? |


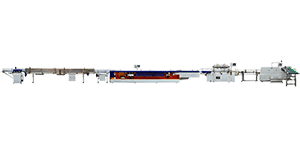 HX6000 PRO High Speed Automatic Book Block Back Gluing Preparation Line
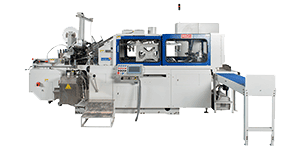 HX60 PLUS High Speed Hardcover Case Making Machine
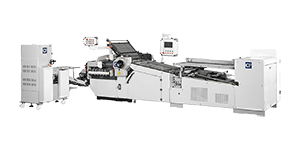 CP Round Pile Combi Folding Machine